Every Instant Pot Trick You'll Ever Need


Your Instant Pot can do so many things, it's likely you don't even know its full potential. We've rounded up everything you've ever wanted to know about Instant Pots, from how to care for them to all the clever hacks you haven't yet tried.
Our Guide to Instant Pot: How to Decide Which Model is Right For You

You've finally decided that its time to give into the multicooker craze and buy an Instant Pot for yourself—but, which do you buy?
Before heading off to the nearest home store, you should know that each model is a little bit different than the next—and one Instant Pot may better than another for your kitchen. Each Instant Pot's price could definitely be a huge factor: but size and functionality are all important things to consider before committing to one model over another.
We're walking you through each of the five most popular Instant Pot models and answering the essential question: Which Instant Pot should you buy?
Instant Pot Lux
The Instant Pot Lux is one of the brand’s first models, and certainly it's most basic. But it still gets the job done! This six-in-one model functions as a pressure cooker, slow cooker, rice cooker, steamer, a food warmer, and another way to sauté veggies. There are 12 preset programs and seven preset temperatures to help you cook a variety of foods with ease. This model is available in three, six, and eight-quart sizes and retails starting at $60.
Shop Now: Instant Pot Lux V3 (6-Quart), $79
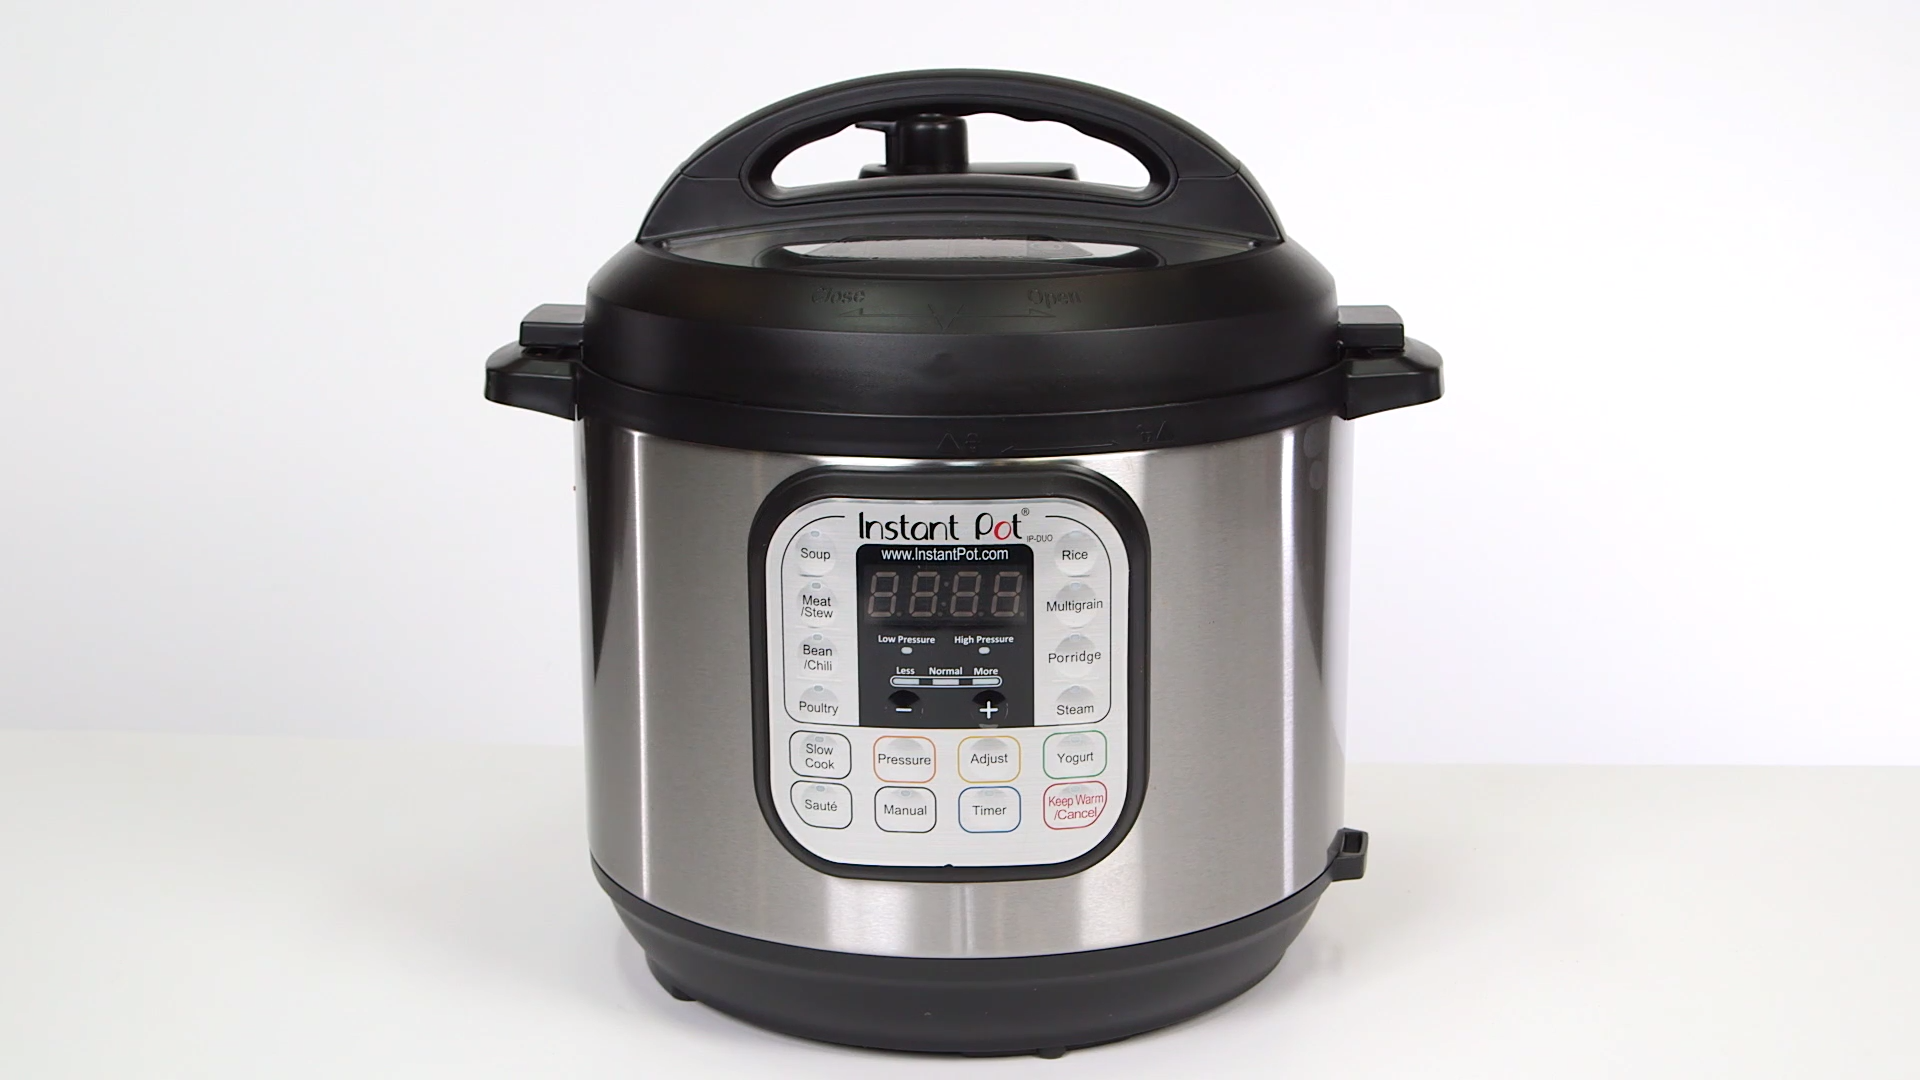
Instant Pot Duo
The Duo is the next step up from the Lux model, as it possesses all the same functions, along with a yogurt-making capability and two more built-in programs. It also has the ability to pressure cook at a low temperature, while the Lux model can only pressure cook at high temperatures.
This is the most popular of the Instant Pot models, as you can usually find one for $100 or less, and comes in three, six, and eight-quart sizes. There is also a super-charged Duo Plus, for the tech-obsessed, which offers an LCD screen as well as sterilization capabilities and a few more cooking functions.
Shop Now: Instant Pot Duo (8-Quart), $89.95
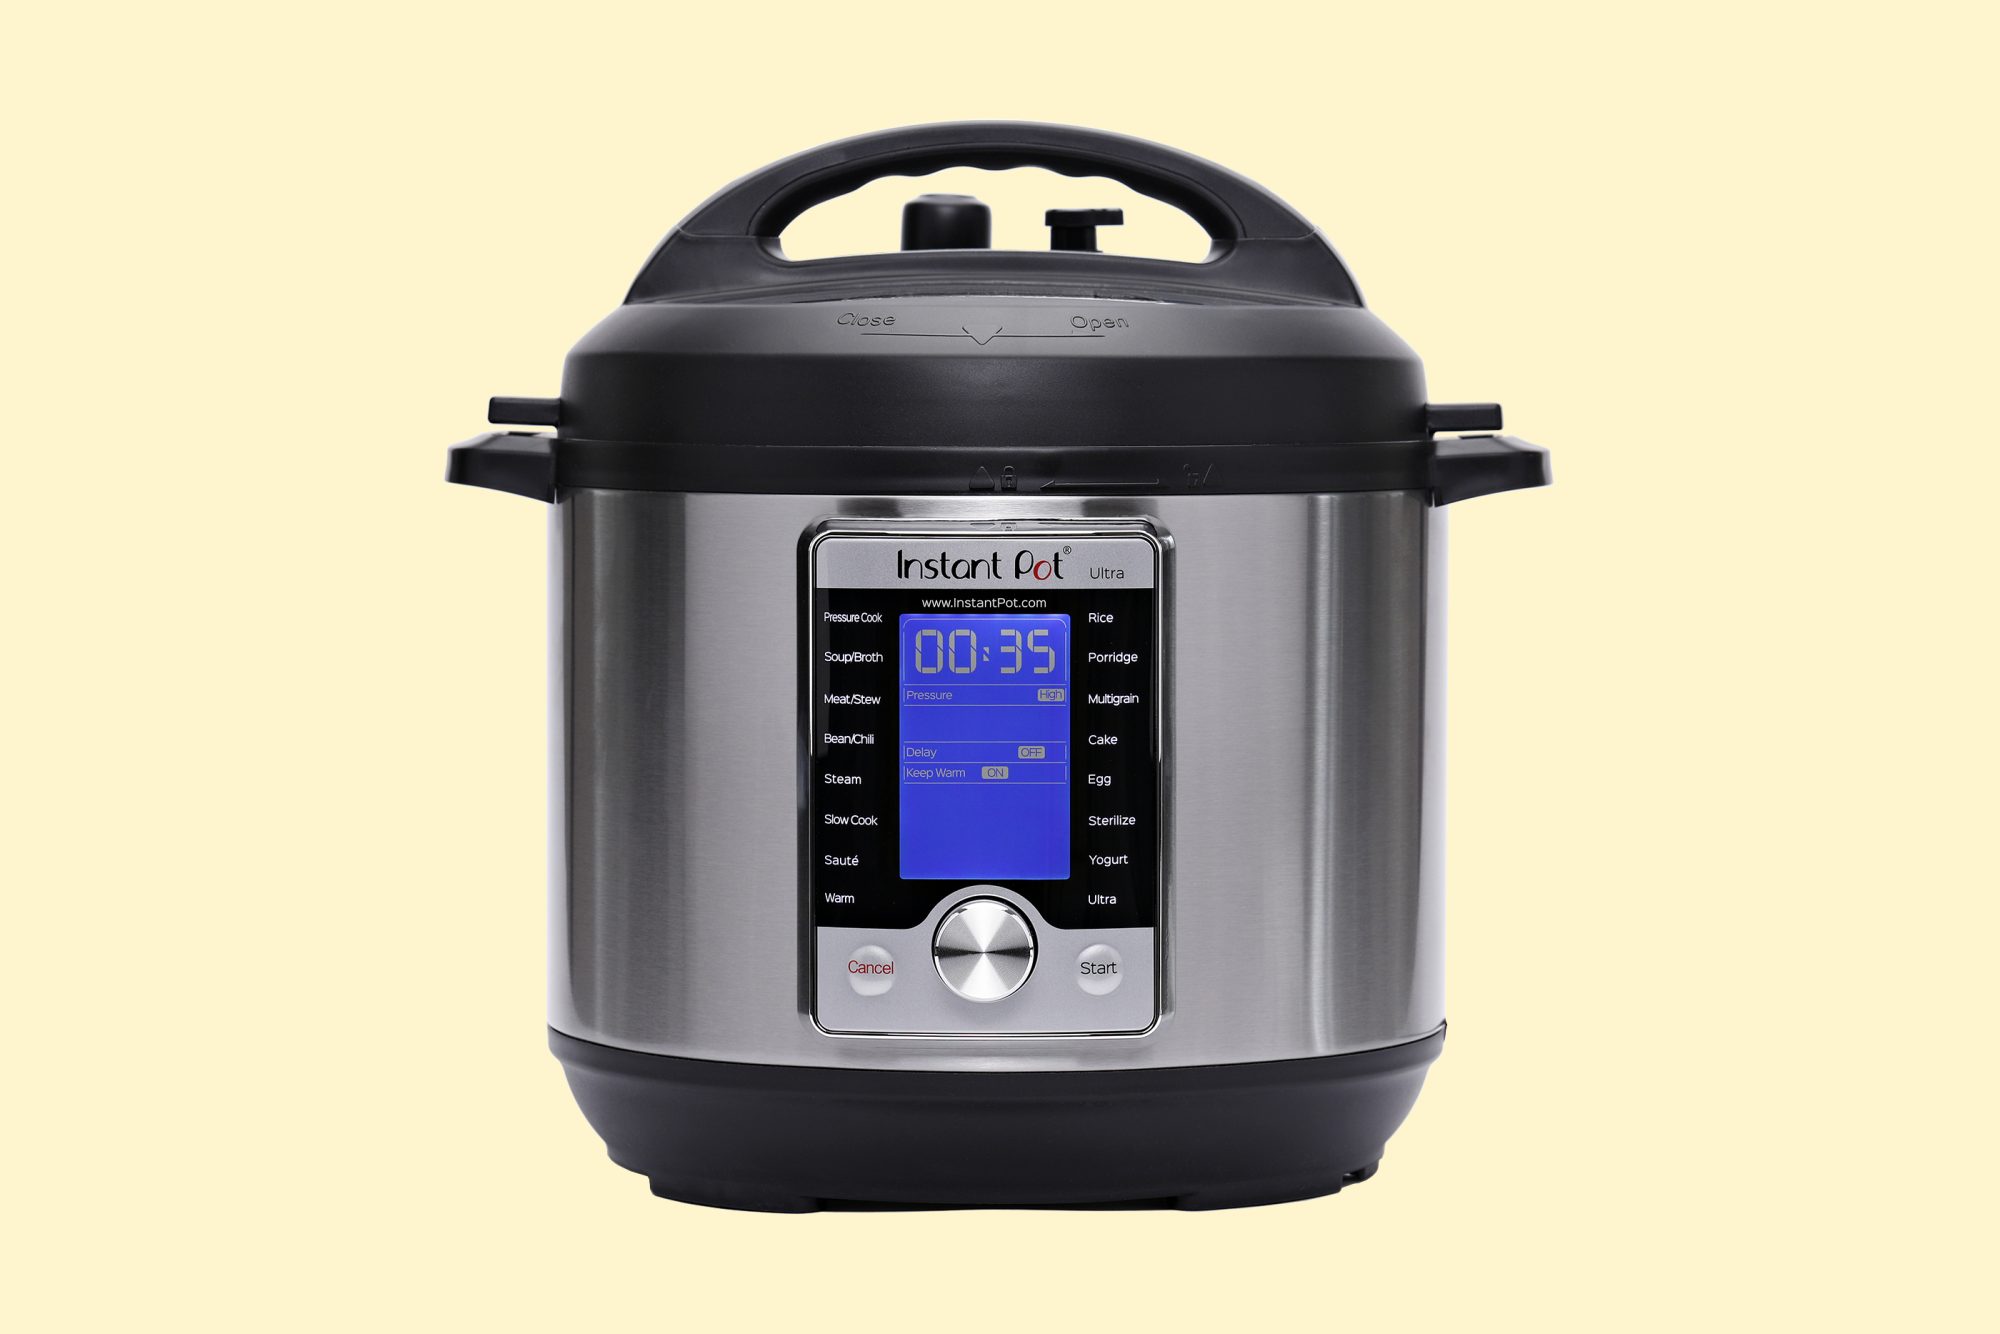
Instant Pot Ultra
The Ultra is perfect for any control freak—this 10-in-1 model comes with an altitude adjustment feature to provide precise cooking times and desired results for those high-altitude dwellers. It'll be a nice change from having to adapt recipes yourself.
This model also offers the ability for you to exercise total control over all types of cooking settings rather than just one standard option. You can pressure cook (or otherwise!) based on your personal preferences, making this model a great gift for those who have already spent years experimenting on a Duo or Lux.
The Ultra comes in three, six, and eight-quart varieties and typically retails anywhere between $90 and $180.
Shop Now: Instant Pot Ultra (8-Quart), $179.95
Instant Pot Max
The Instant Pot Max is one of the latest models to hit the market—but it is also the most expensive.
The Max cooks ten-to-fifteen times faster than the other Instant Pot models, according to the company’s website. This model also has 13 safety features, compared to the other models’ 10 or 11 features. It is also the only series that allows for sous vide cooking. The Max is only offered in the six-quart size, and retails around $200.
Shop Now: Instant Pot Max (6-Quart), $199.95
Instant Pot Smart Wi-Fi
We’ve mentioned that digital tech is one of the biggest kitchen trends for 2019, and this Smart Wi-Fi model is a exciting new way to bring this trend into your own home. While you can’t exactly start pressure-cooking from your office, you can still control your Instant Pot from another part of the house.
The best part of having a Wi-Fi enabled Instant Pot, however, is access to hundreds of prescripted recipes on your phone and the ability to create you own that can be easily uploaded to your cooker. The Smart Wi-Fi model is only available in the six-quart size, and typically retails around $150.
Shop Now: Instant Pot Smart Wi-Fi (6-Quart), $90
1 of 18
9 Things You Should Know the First Time You Use an Instant Pot
There’s a lot not to like about the Instant Pot. Its logo calls to mind an ‘80s mall store—Claire’s Boutique meets 5-7-9—and not in a good way. There are a full 18 buttons on its control panel, which presumably will require a MacGyver level of skill to defuse if something goes awry. And most dauntingly, it’s a pressure cooker, so it’s designed to cook things fast under high pressure. (Whose mom hasn’t warned them “not to blow up the whole house with that thing?”)
I bought an Instant Pot on sale online, then skulked around my kitchen, avoiding eye contact, for two full weeks. It was only when my groceries were so scarce that I had nothing but dried beans that I turned to Melissa Clark, a cooking hero and the author of a new pressure cooker cookbook. Beans, she had written, are among the things the Instant Pot does best. I sighed, plugged the thing in, and braced. Here are the things I think you should know for your own test drive.
1. It’s really big.
Not only does the 6-quart version I bought take up a 13-by-12.6 inch footprint, but you have to account for the steam that emerges when you manually release it: a foot to two feet of the stuff, straight into the air. This is helpful to know if you have plants above your prep area, or a curious cat.
2. It comes with a ton of literature.
The daunting amount of literature includes a bright yellow warning square, a recipe booklet, an instruction booklet, an “ownership registration card,” an “updated feature information sheet,” and a “quick reference card.” For now, set everything aside except the instruction booklet and the safety card.
3. The primary thing to worry about is steam.
The jiggly little knob atop the beast is the thing to worry about. It won’t feel like it’s securely attached to the IP, and if your fear—like mine—is that you’ll blow up your apartment, this is not a comfort. But that’s how it’s supposed to work; you simply toggle it between “sealed” and “venting” very carefully. Best bet: Never hover any part of you over the IP while it is on.
4. It takes a while to preheat.
You may have read that a pork shoulder is ready in 30 minutes or some such. In truth, your IP needs to come to temperature—in the same way pasta water needs to boil—before you can start your countdown. It’s annoying. My kidney beans—I riffed on a Clark cannellini bean recipe—took 22 minutes to pre-heat, then cooked for 30 minutes.
[tiVideo is_video="1" video_id="459741"]
5. It’s noisy.
This is a highly communicative gadget. It beeps like R2-D2 when you’re putting on the lid. It beeps three times when it starts cooking your food, and ten times when the cooking time has expired. Plus, you’ll hear clicks throughout the cooking process. I appreciated the user-friendliness, but the beeps made me edgy, and I set up camp on the far side of the kitchen. “Set it and forget it” felt a whole lot more like, “Set it and obsess over it.”
6. You can’t use the usual senses.
I use my nose to tell when bread and meat are caramelized, but not burning. I taste food for salt, acid and sweetness. I use my ears and eyes to know when butter is about to brown. The Instant Pot requires you to fly blind until you go through the rigamarole of releasing steam and unsealing it, which takes a few minutes. This is a very different way of cooking.
7. The user manual is not intuitive.
I would have appreciated more illustrations in the manual. It should show you that—after you carefully flip down the steam release gadget, or let it sit and release naturally—the “float valve,” a tiny silver button, will completely drop about a centimeter into the well of the machine.
8. You can fix seasoning relatively late in the process.
I cooked my kidney beans in the IP for 25 minutes before tasting them. They were poorly seasoned and unevenly cooked, so I stirred them, added salt and cumin, pressure-cooked them for another five minutes, and tasted again. I’m sure this won’t be the case every time, but somehow the pressure worked its magic, fixing the seasoning and making my beans velvety in texture and kind of amazing.
9. It works.
Prepping, soaking, cooking, and seasoning the beans took me about an hour and a half—a fraction of the usual time. I’ll tweak things going forward, trying the “sauté” function for onions, then adding the beans. I can’t wait to try homemade meatballs and bone-in pork shoulder. I remain a little intimidated, although yes, I’m glad I bought it. I’ll report back on take two, so watch our Facebook page!
Alex Van Buren is a food and travel writer living in Brooklyn, New York whose work has appeared in Bon Appétit, Gourmet, Travel + Leisure, New York Magazine, Martha Stewart Living, Gourmet, and Epicurious. Follow her on Instagram and Twitter @alexvanburen.
2 of 18
5 Things You Should Not Do with Your Instant Pot
We all love a good Instant Pot recipe that makes dinner come together with little effort, and even less cleanup. It’s no wonder this super appliance has developed a cult following—the Instant Pot saves you valuable cabinet space as it acts as a pressure cooker, slow cooker, rice cooker, steamer, and even yogurt maker. It’s smart features allows you to choose from a multitude of settings for fast, even, and fully cooked foods.
Our best Instant Pot recipes include everything from sandwiches and soups to savory chicken thighs. There’s even a Facebook group dedicated solely to the mighty Instant Pot, providing the self-proclaimed “pot heads” a forum to share recipes and tips. Clearly, the Instant Pot is a multifaceted gem of kitchen tools, but as much as we admire its powers and enjoy utilizing them to save time in the kitchen… there are in fact a few cooking tasks that the IP just can’t do. While some of these may be somewhat obvious to the seasoned home cook, we’ve heard the phrase, “You can make ANYTHING in it!” enough times to feel compelled to clarify everything you should not attempt with your Instant Pot.
WATCH: How to Use An Instant Pot
[tiVideo is_video="1" video_id="411027"]
Deep Frying
An Instant Pot will not get hot enough to deep-fry foods uncovered; as much as it can do, it isn’t meant to function as a fryer. If you are looking to make classic breaded fried chicken, a Dutch oven or deep-fryer is best. However, you can use your Instant Pot for shallow “pan frying.”
Stir-Frying
Again, if you want to achieve super hot and crisp stir-fried dishes, an Instant Pot is not be the best tool to use. You need a wide, shallow pan with high sides, like a wok, placed over a heat high in order to accomplish a great texture/stir-fry experience. An Instant Pot is more apt to simply steam your stir-fry components, leaving you with soggy veggies.
Grilling
If you are looking for signature charred grill marks on your food, you most definitely cannot accomplish that with an Instant Pot (obviously). If you’re trying to bring your “grilling” indoors, reach for a cast-iron grill pan rather than the IP. Your pan grill is an excellent option for producing perfect charred grill marks in the comfort of your kitchen. Just make sure you have a ventilation hood running or crack a window to deal with any smokiness.
Baking Cookies
Sorry to break it to you, but you will have to crank up your trusty, real-deal oven if you want crunchy on the outside,chewy on the inside cookies. Cookies need to be baked on a flat cookie sheet with space to spread while baking. Typically, anything else that requires baking on a baking sheet, should be left out of your Instant Pot.
Canning
It is not recommended to can foods with an Instant Pot. Despite its “pressure cooking” abilities, the pot does not get hot enough and the pressure provided is not intense enough to safely can foods. In other words, your Instant Pot cannot provide the necessary conditions to kill botulism spores that develop in canned foods with improper canning.
3 of 18
What to Do If You Damage Your Instant Pot
There’s no denying that Instant Pots—the modern day pressure cookerthat has built a massive devoted following—are built to last. With a stainless steel body and inner pot, 10 built-in safety features, and no chemical coatings, the company claims the machines should last for over 100,000 uses. But, we’re all human and kitchen mistakes happen. So what should you do if you’ve dropped, burnt, or damaged your Instant Pot in another way?
Buying Replacement Parts vs. a New Machine
Certain aspects of the Instant Pot can be very affordably replaced if damaged irreparably. Smaller parts—which have a larger chance of getting lost or tossed—like condensation collectors, steam release handles, float valves, and detachable power cords can all be replaced for under $20 through the official Instant Pot website.
The most fragile part of the Instant Pot, and the one most likely to be replaced at least once every few years, is the ring, which experiences a lot of wear during everyday usage. In the case of damage, or when your ring is simply worn down, sealing rings can be replaced online for between $6-13 depending on the size of the machine.
RELATED: How to Deal with Your Smelly Instant Pot Ring
When it comes to replacing the inner pots, lids, and bases, the prices go up significantly. Although the inner stainless steel pot was designed to survive any kind of damage, in the case of loss, a replacement can be purchased for between $30-35 depending on the size.
The replacement parts that will do the most damage to your wallet are bases and lids. However, in most cases replacing one of these pricier pieces will still save you cash in comparison to purchasing a brand new Instant Pot. Though each Instant Pot does come with a one-year warranty, this policy only covers machines that are faulty and not any damage that is a result of a user error.
In addition to the official site, Instant Pot parts can also be found on Amazon, but typically not for a discount in comparison to the parts sold by the company.
WATCH: How to make Instant Pot Beef Stew
Common Mistakes to Avoid
The best way to avoid the time and money needed to repair a damaged Instant Pot is to treat the machine with care, and to avoid these common but potentially harmful mistakes.
- Instant Pot pressure cooker valves should never be covered, as releasing steam is the machine’s main safety mechanism. While it’s tempting to limit the amount of steam being released with a towel or cloth, obstructing this vent could result in permanent damage to the cooker. For an alternative method for clearing steam out of the kitchen quickly, place the device under the exhaust fan of your range hood so that the steam is slightly disseminated.
- Avoid overfilling your Instant Pot, as this can cause food to spray out of the pressure valve upon release. This will result in both a messy situation and food residue potentially getting stuck in the valve and interfering with machine functionality in the future. Your pot should never be more than 2/3 full, or ½ full if you’re preparing a food that expands during cooking, like rice. If you’re worried that you’ve potentially overfilled your pot, use the natural pressure release method, turning off the heat and allowing the pressure to lower slowly over a 5-20 minute period.
- Make sure the inner pot in always in place before tossing in ingredients. While this might seem obvious, during a hectic dinnertime it’s easy to let this step slip your mind. Try placing a lid or wooden spoon over the opening to the pot every time you take the inner portion out, so that it will never slip your mind to return the inner pot into position before tossing in your ingredients.
- If you’re planning to store your Instant Pot on the stovetop, place a wooden cutting board below the machine to prevent any accidental burning of the bottom.
RELATED: 5 Things You Should Not Do with Your Instant Pot
It’s important to note that due to the high build up of pressure, using a damaged Instant Pot should be approached with caution to prevent a dangerous cooking environment. If you’re concerned about the condition of your pot, it’s always best to err on the side of caution and contact Instant Pot support with your issue before attempting to use the pot again.
For inspiration on how to get cooking with your Instant Pot, check out these easy and delicious recipes.
4 of 18
8 Instant Pot Hacks to Make Your Life Easier
There’s something glorious about the Instant Pot. It delivers tasty, hassle-free meals in a short period of time, and it can make your life so much easier.
Basically, it’s a magical cooking tool that combines an electric pressure cooker, a warming pot, a slow cooker, a steamer, a yogurt maker, and a rice cooker, all in one. (Yup—now that’s impressive.)
Not only does it free up some counter space, but it also cooks up some amazing food. Yet you should use it to your advantage to make the most of your meals, have fun experimenting, and make meal prep much easier by cooking foods that would normally require more time and effort. Here are 8 Instant Pot hacks to go crazy for right now.
Look for Frozen, Pre-Chopped Veggies
Buy frozen, pre-chopped veggies—it’s totally okay. “Yes, sounds simple, but when you're relying on the ease of an Instant Pot, you want to really think stress-free (and fairly mess-free) cleanup,” says Elizabeth Ann Shaw, MS, RDN, CLT, CPT. Plus, the nutrition is the same (if not better!), so you’re not skimping on any vitamins and minerals in that frozen pack.
“Purchasing frozen, pre-chopped veggies like broccoli and bell peppers makes a quick Broccoli Cheese Soup or enchilada and quinoa dish come together that much easier,” Shaw says, as an example.
Go With the Right Setting and Trust It
“Focus on functionality! Yes, if you're making a slow-cooked dish in the Instant Pot, don't try to cook it on pressure cooked,” says Shaw. “Use the slow cooker settings and follow the recipe instructions rather than trying to get it done too quickly. Doing so may result in a rubbery roast or chewy chicken,” she explains.
To clarify the difference—a slow cooker is for cooking a meal "low and slow", while a pressure cooker works to cook something fast at a high temperature with pressure. “The Instant Pot has settings for both to simulate the cooking,” says Shaw, but you should go with whatever recipe you’re using and trust that it’ll come out properly on the correct setting.
Make a Big Batch of Rice
“The Instant Pot is THE BEST rice cooker around. Toss in brown rice, water and salt. No matter how much rice you want to make, the cooking time is the same so make lots for weekly meal prep,” says Dana Angelo White, MS, RD, ATC, author of the Healthy Instant Pot Cookbook. This is a great use for holiday planning and parties, as well as simply getting your meals prepared in advance for the whole week ahead.
You can also make a killer risotto. “It seems hard to believe that risotto perfection can be achieved without attentive stirring but the Instant Pot makes it possible and easy enough for a healthy and fast weeknight meal,” she says. Ten minutes of cooking and another ten for natural release will give you a creamy and comforting recipe to dig into.
Hack Hearty Squash and Potatoes
Squash can be pretty challenging to cook, so use your Instant Pot to do the tricky work for you. “Instead of wrestling to cook cumbersome veggies like sweet potatoes and butternut or spaghetti squash, pop winter squash in the Instant Pot,” she says. Poke a few holes in the outer flesh, place on a steamer rack, pour in 1 cup of water, and cook on high pressure for 10 to 15 minutes until it’s done.
Make Freezer Meals
Make-ahead meals can go straight from freezer to the Instant Pot in a jiffy. “Combine your favorite protein and sauce in a freezer safe bag and store in the freezer. When ready to cook, remove from the bag, toss in the pot and cook on high pressure for about 15 minutes (exact times may vary),” says White.
“When the cook time is done, quick release the pressure, remove the lid and stir in fresh or frozen veggies, [as] they will be heated through very quickly,” she says.
You can use whatever foods you want—there’s much versatility when it comes to freezer meals and the instant pot. “Some of my favorite combinations are chicken breast tenders and Cajun seasoning with onions and peppers and sliced flank steak and teriyaki sauce with broccoli or sugar snap peas,” says White. Before serving, add a handful of fresh herbs or sesame seeds for a final burst of flavor, she suggests.
RELATED: Must-Try Instant Pot Recipes That Are Surprisingly Healthy
Cook Beans Quickly
Cooking beans from scratch can be pretty cumbersome and take a while—not so great when you’re exhausted after a long day at the office. “The process of soaking, draining and cooking dried beans can take a lot of extra time when prepared the traditional way,” says White. “The Instant Pot method requires no overnight soak—perfect black beans are less than an hour away,” she says. And you can then avoid sodium from a can of beans, too.
Use It for Your Favorite Healthier Desserts
“If you haven’t made cheesecake in your Instant Pot, you aren’t living up to your full Instant Pot potential. The moist, high pressure is the perfect cooking environment for light, fluffy and evenly cooked cheesecake,” says White.
You can make lightened up versions using a combination of Greek yogurt and reduced fat cream cheese. “My recipe for Rainbow Cheesecake can be found on the Instant Pot website and recipe app,” she says, if you’re looking for some inspiration.
Tackle Tough Cuts of Meat
“The Instant Pot is the ideal tool for quickly cooking cuts of meats that usually require long and slow cook times,” says White. And no one has time for that during a busy week! To make sure you can still enjoy these delicious meals, without all the hassle, turn to the instant pot. “Beef roasts, pork shoulders and racks of ribs can be cooked in a fraction of the time,” she explains.
5 of 18
Why You Should NOT Use Your Instant Pot as a Slow Cooker
Editor's Note: The Instant Pot is great for making a lot of amazing things, from perfect stuffed peppers, to delicious deviled eggs and more. But most of the time, we love it for its speedy pressure-cooking capabilities. So what about that other button, the one that says "slow cook" on it?
RELATED: All the Slow Cooker Recipes You Could Ever Want
It turns out that, while the Instant Pot is great at being, well, Instant, it's not so great at slowing down. Why? For the answer, we turn to Sarah DiGregorio, a James Beard nominated writer and author of Adventures in Slow Cooking. This excerpt from her book explains why a technological marvel like the Instant Pot won't work as well as a slow cooker—and how to adjust your recipes if you're dead set on trying it anyway.
---
The Instant Pot is a multi-cooker—it has settings for pressure cooking, slow cooking, sautéing, and yogurt making, and it can probably do your taxes, too. It’s a very cool appliance, but I don’t think it’s as good at slow cooking as traditional slow cookers are. That’s because the lid seals and locks in place—as it must for pressure cooking—which allows for even less evaporation than traditional slow cookers. In some circumstances, that means a dish ends up swimming in liquid when you translate a traditional slow-cooker recipe to slow cooking in the Instant Pot. (The locking lid also means you can’t use a probe thermometer and close the lid over it—not the end of the world, but not ideal.) I also find the control panel not at all intuitive, though of course you can figure it out once you fiddle with it for a while.
To further confuse matters, the Instant Pot also has three slow-cooker heat settings (not counting warm): less (180˚F to 190˚F), normal (190˚F to 200˚F), and more (200˚F to 210˚F). Those do not exactly correspond to the heat settings on most other slow cookers—although the “less” setting seems like it would be the same as low, it seems to run much slower. Instant Pot does have an auto-switch to warm, as does a traditional slow cooker.
All that said, if you have an Instant Pot, yes, you can use the slow cooker setting to make many of the recipes in my book, with a few caveats.
· The manufacturer claims the Instant Pot’s “less” setting runs at about 180˚F, but I don’t think I believe them. (And I can’t use a probe thermometer to find out for sure because of the way the lid locks into place.) The “less” setting runs very, very slow. If you’re looking to stretch out a cooking time, try the “less” setting where “low” is called for, and increase the cooking time by an hour or so. But the better analog is the “normal” setting: In general, use the “normal” setting for when “low” is called for and the “more” setting where “high” is called for.
· If the finished product is quite dependent on a certain ratio of liquid in the dish (as in polenta), try reducing the cooking liquid slightly, by about 15 to 20 percent, to compensate for the complete lack of evaporation—or alternately, buy this slow cooker lid for your Instant Pot, which allows steam to escape.
This is an excerpt from Adventures in Slow Cooking by Sarah DiGregorio. Copyright © 2017 by Sarah DiGregorio. Reprinted by permission of William Morrow, an imprint of HarperCollins Publishers.
6 of 18
The Simple 2-Minute Fix to Get That Funky Smell Out of Your Instant Pot


As much as we love chili, we’d rather not smell it every. single. day.
What can’t the Instant Pot do? It pressure cooks, slow cooks, steams, sautés, cooks rice, makes yogurt—and as we just reported, its newest counterpart (the Instant Vortex) actually air fries. Seriously, if the next generation does taxes, I won’t be the slightest bit surprised.
Once you’ve jumped on the Instant Pot bandwagon, you’ll likely look back and wonder how you ever managed to get dinner (and breakfast, lunch, even dessert) on the table without it. But as with any product that gets a lot of love, the more you use your Instant Pot the more you’ll notice how easily food can get trapped in all the nooks and crannies of the lid, pot, and pressure release valve. Generally speaking, however, these parts of Instant Pot are pretty quick to clean—take all the removable parts apart, wipe down the outside, use a small brush to clear out any food trapped in crevices, and give everything a thorough wash in warm, sudsy water.
RELATED: 6 Genius Ways You Can Use Your Instant Pot for Meal Prep
But if you’ve soaked and scrubbed the thing to the gills and still smell last week’s spicy beef stew, there’s one part that’s to blame: the silicone sealing ring. This skinny, circular piece of rubber, wrapped around the inside of the lid, is what’s responsible for keeping steam and moisture from escaping while your chicken curry cooks. Because it’s made from silicone (which is prone to absorbing odors) and is the end-point for a lot of concentrated, super-hot steam, this thing can get dank. Especially for those who use their Instant Pot regularly.
Don’t worry, this stinky pot problem happens to everyone. Luckily, cleaning your silicone sealing ring is super simple. For starters, it’s dishwasher safe, and most of the time that gets the unpleasant odor out. But if you can still smell the cumin afterwards (or you don’t have a dishwasher), you’re going to have to bust out our favorite cleaning agent: vinegar.
Using white vinegar to remove odors from the silicone ring is quick and easy: simply fill the cooking insert in your Instant Pot with two cups of vinegar, seal the lid, and set the Steam setting for two minutes. Once your cycle has finished, let the sealing ring air dry fully before you replace it. It should smell good as new!
We also recommend having a couple of extra rings on hand—this way, you can use one for savory dishes and save the other for sweets (hi, Instant Pot cheesecake). And after rigorous use, the ring may deteriorate. If you notice any cracking, leaking, or deformation in your sealing ring, make sure to replace it right away (2 for $12, amazon.com).
7 of 18
How to Turn Any One Pot Pasta Into Instant Pot Pasta
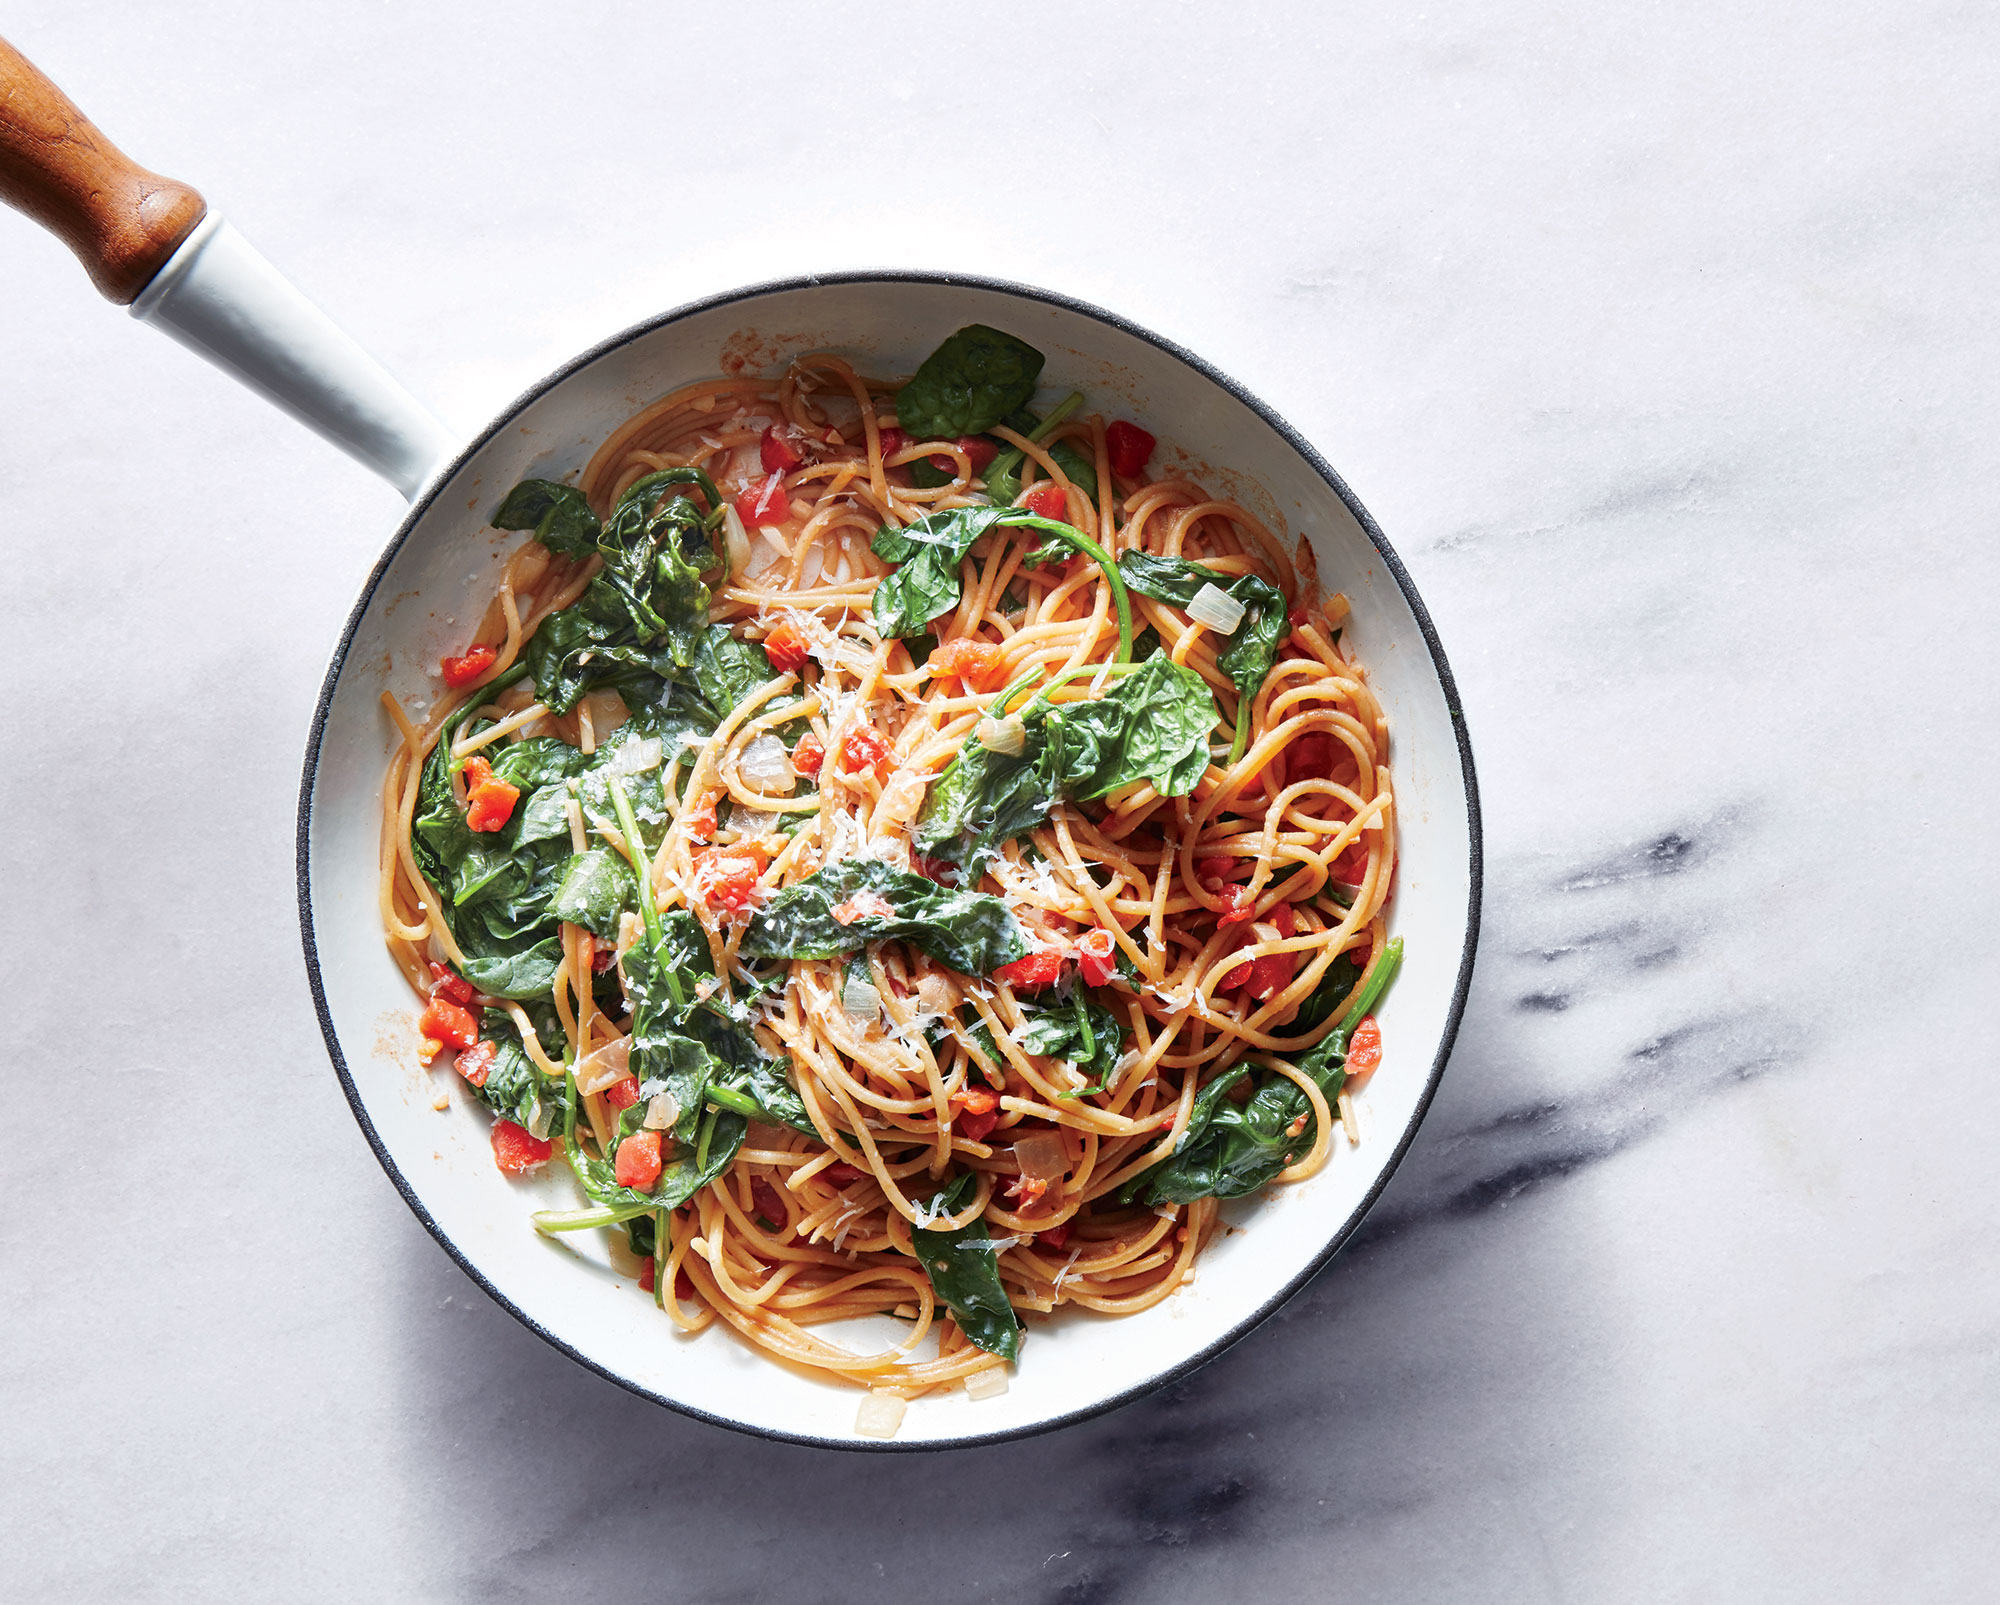

A few years ago, the one-pot pasta recipe hit the digital airwaves and became an instantaneous viral sensation. The idea that you could put some basic ingredients in a pan with water and pasta and end up with dinner in about ten minutes was revolutionary, and the fact that it tasted great didn’t hurt.
The science behind why the technique is so great is simple. Instead of cooking pasta and separately and then bringing together with the addition of some of the starch-enriched pasta cooking water, this method leaves the starch right in the sauce as it cooks, and the flavors absorb into the pasta beautifully. You end up with a glossy, flavorful sauce that coats the pasta, with flavors that belie the quick cooking method.
And if you think these one-pot dishes are easy and effective on the stovetop, wait until you try them in your multi-cooker. The beautiful part about these one-pot recipes is that the recipe already contains the right proportions of pasta to water to sauce ingredients, so there is only an adjustment needed in the cooking time and technique.
Why shift these already easy one-pot recipe to the multi-cooker? What exactly do you gain?
One, if you think the pasta absorbs flavor when cooked in the liquid, you will be really impressed with how the pressure of these vessels improves it even further. Sort of like the difference between marinating something in a shallow pan of marinade, versus sealing it in your vacuum sealer. The pressure created helps to pull the sauce and seasonings into the pasta for deep and complex flavor.
Two, if you have kids that are starting to learn to cook but aren’t quite ready to stand at a stovetop stirring a spitting pan of lava hot pasta, this is a dish that they can make all on their own, or with the help of a babysitter. Easier, faster and less expensive than ordering a pizza, and a good skill to start building in your offspring.
Three, if you don’t have access to a stove, it's incredibly useful. Whether you are in a dorm or sharing a space where access to a kitchen is limited, all you need to make these dishes is an electrical outlet, and you can still have a delicious home-cooked meal. Ditto if it is hot as blazes and you have no air-conditioning, the idea of turning on a stove and standing over it for 15 seems impossible.Multi-cookers put off very little residual heat, and once they are off, they are off, plus there is no watching or stirring needed, everything is happening magically in the pot!
As with the one-pot recipes, multi-cookers work best with either small shapes of pasta (elbows, bowties, fusilli, penne and the like) or thicker strands like linguine or fettucine. Unlike stovetop, if you are using strands, you’ll need to break them in half to use in the multi-cooker. Do not try and cook thin strands like spaghettini or angel hair in a multi-cooker, they will turn to mush.
Take any recipe for a one-pot pasta, dump all the ingredients into your multi-cooker, and give it a stir to ensure the pasta doesn’t stick together. All of these recipes include a large enough amount of water or other liquid to properly cook the pasta, so you don’t have to worry about burning.
Close and lock the pot, and use this handy formula to determine cook time: Take the number on your package directions for the pasta of choice, divide by two and then subtract one. So, if your package of rigatoni says to cook for 14 minutes in boiling water, divide by two, which is seven and then subtract one, which will give you a cook time of six minutes. This little formula takes into account the cooking that will start to happen as the pot builds pressure and will continue as you do the release. If your pasta says to cook for an odd number of minutes, round down and not up, because you will always want to err on the side of al dente, especially since pasta continues to cook a bit as it sits before serving.
Set your machine for high pressure for the number of minutes you have determined, then wait. Do what I call a semi-quick release, opening and closing the steam vent for five to ten seconds at a time until fully released. You don’t want to natural release, your pasta will overcook, but a full quick release can get sputtery, so I treat it more like opening a bottle of carbonated liquid you just dropped on the floor.
Once the release is complete, open the lid and taste the pasta. If it is slightly too al dente for you, quickly put the lid back on and let rest, covered, for two to three minutes. Add any seasoning adjustments, fresh herbs and cheese and give a good stir and serve! That's it. You've got a one pot pasta dish from the Instant Pot.
8 of 18
6 Genius Ways You Can Use Your Instant Pot for Meal Prep

The Instant Pot is breathing new life into our ability to get a fuss-free dinner on the table in practically no time. We've ranted and raved about how much we love it for making set-it-and-forget-it style dishes like mashed potatoes, macaroni and cheese, and chicken pho. But let's not limit it to just being our go-to for making one-pot soups, stews, and starchy sides! Our beloved IP can do so much more. Next time you're powering through a Sunday meal prep session, enlist your multi-cooker for help making these delicious dish components. They're super versatile, so you can mix and match ingredients as you prep lunches and dinners throughout the week: salads, sandwiches, stir fries, grain bowls, frittatas, and more. Best part about the Instant Pot ($69, amazon.com) is that cooking is hands-free, which means you can cook a week's worth of meals and spend some quality time with your couch and a book and a glass of pinot simultaneously. Now that we're motivated, here are some ways you can use your Instant Pot to meal prep:
Cooking a Whole Chicken
Ah, rotisserie chicken—the darling of all meal prep recipes. We love it, too, but can we agree that the store-bought ones can be a bit... dry? If you cook a chicken in your Instant Pot, we promise you'll find the results are melt-in-your-mouth tender. It won't have the same crispy exterior as your oven-baked breasts or drumsticks, but for a dish like chicken curry, soup, or Pad Thai, you won't miss that one bit.
Hard Boiling Eggs
Certainly one of the most versatile (and finicky) foods, hard boiled eggs are built for breakfast, lunch, dinner, and every snack in between. The Instant Pot does an expert job at cooking shelled eggs because it can make a large batch of them (if you have a rack, you can make up to 14 at once) quickly, and you can count on them being super easy to peel. We recommend pressure cooking eggs in water for six minutes, then releasing the pressure with the Quick Release valve and transferring the eggs to an ice bath for five minutes. Peel, then follow this expert guide for all the ways you can use them.
Steaming Veggies
There's no right or wrong answer to what vegetables want to get steamy in your Instant Pot. From carrots to cauliflower to kabocha squash, the steam setting is the way to go. You can toss in a ton at once (as long as they take about the same amount of time to cook) or steam in sessions. Just make sure not to cook veggies too long and always use the Quick Release valve to avoid a mushy mess.
RELATED: 9 Things You Should Know the First Time You Use an Instant Pot
Hydrating Every Type of Bean
This is one of our favorite lesser-known uses for the Instant Pot. Use the "Bean/Chili" function to cook black beans for burritos, cannellini beans for minestrone soup, and chickpeas for homemade hummus or Greek salad.
Cooking Quinoa
The Instant Pot will turn out super fluffy quinoa. We recommend rinsing first, then pressure-cooking on High for five minutes before releasing with the Quick Release valve. Serve in grain bowls, mix into the base for homemade veggie burgers, or alongside salmon. In fact, we recommend outsourcing all grains to the IP: you can cook white or brown rice, steel cut oats, wheat berries, and more in your multi-cooker.
Making Yogurt
This one may seem obvious because it's a pre-programmed setting on all Instant Pot models (save for the Lux), but have you ever thought of the money-saving potential of this little button? A tub of Greek yogurt can cost upwards of $10, and considering how easy it is to DIY, adding breakfast to your meal prep to-do list could save you major bucks at the grocery store.
9 of 18
Why You Should Make Sweet Tea in Your Instant Pot

We're Southerners. We don't like being told we're making our sweet tea totally wrong.
While we hate to be the bearers of bad news: We're making our sweet tea totally wrong. You may have never considered your Instant Pot an ally in the beverage department, but the handy machine brews a stellar batch of sweet tea.
As The Kitchn recently revealed, brewing your sweet tea in this common household appliance is indeed a superior way to make the Southern staple.
"Sweet tea is so simple, right? Boil water, steep tea, add sugar — you hardly need a gadget to do it," comments writer Meghan Splawn, then noting her skepticism of using the Instant Pot. Boy, was she mistaken. "The Instant Pot boils the water and extracts the flavor faster, making the tea stronger but less bitter," she quickly discovered after making a batch. She hasn't looked back since and kindly shared her recipe for making Instant Pot iced tea in the article as well.
WATCH: Live at Southern Living—Sweet Tea Taste Test
Well, we guess we'll have to invite some loved ones over for a porch session tonight and test out this unique brewing method for ourselves. Report back, friends.
10 of 18
How to Make Any Stock in Your Instant Pot

I am a big believer in the glory of homemade stock. Grocery bought stock works just fine for many applications, but if you want to give your meals—particularly a nice soup or sauce—that extra restaurant-level complexity of flavor, homemade stock is the way to do it. You can make it from the scraps that you have leftover from making other things—just throw chicken bones and carrot tops and other trimmings into a zip-top bag in the freezer until you've collected enough to make a decent stock. ("Enough" here is subjective, but I'd say you have enough to make stock if you have the equivalent of one chicken carcass, and adding more will just deepen the flavor.)
Making stock isn't a particularly complicated process—basically you put your bits into a deep stockpot, cover in water, and let is simmer slowly for several hours. But the timing part is what is often annoying, particularly if you don't have several hours to babysit a pot on the stove. A slow cooker will work just fine, but I've found that making stock in the Instant Pot means that you can coax just as much flavor out of your scraps and into the stock as you would doing the stovetop method.
Here's the basic formula: Pile all the ingredients that you want to use in your stock into the bottom of an Instant Pot. Cover it with about four quarts of water. (This will vary depending on the size of your Instant Pot, but you want to fill it to about an inch or two from the top.) Then set the pressure to "high" for 60 minutes. Let it cook and release the pressure valve either naturally or manually. Strain and use however you want. You can play around with going a little bit longer or shorter, time-wise, but I've found an hour is about right most of the time.
It's ridiculously easy, and it has the added benefit of freeing up stove space. It's also the only way I can convince myself to make stock when it gets so warm out that turning on the oven seems like an awful plan. Do you need an Instant Pot to make stock? Of course not. But will you end up making a lot more stock using one? Maybe so! I do.
11 of 18
Your Top Instant Pot Questions, Answered

So, you’re the owner of a brand-new (or purchased, then abandoned, then scooped up at a yard sale) Instant Pot, or you finally worked up the courage to take it out of its box. Congratulations! Your other appliances may get a little jealous.
Remember, though, that an Instant Pot is an appliance, and just like other appliances, it’ll take a little time to familiarize yourself with it, and you might be a little confused, maybe even afraid. To be fair, it kind of looks like an UFO and makes some mysterious sounds, and even though it’s called an Instant Pot, pushing a button won’t magically make dinner appear.
These are the top questions new and prospective Potheads have, and how to solve those problems.
Watch: How to Make Instant Pot Chicken Soup
Which Instant Pot should I buy?
There are currently 18 Instant Pot variations on the market (this does not include the multicooker, sous vide or blender), ranging from the simpler Lux to the behemoth Max. Price is a huge factor here, and if you’re looking for a more advanced (i.e. expensive) model, you might want to wait for a sale (or look around for a used or bought-but-never-used one!). Otherwise, you’re starting at $79.95 and ending around $200. Apparently the Max and Smart WiFi models have unlimited multi-use programmable abilities, whatever that means. If what I just said scares you, lean towards the simpler models. Once you’ve picked your desired functionality, it’s time to look at size. How often do you plan on using your Instant Pot, and how many people are you feeding? Keep in mind that with a smaller pot, say, the 3-quart Duo Mini, you’ll need to downsize some recipes (more on that later). You do not want soup spilling out of your Instant Pot.
What’s the first thing I should make in my Instant Pot?
Once you’re brave enough to take your Instant Pot out of its box and unfold the instruction manual, you’re gonna see something about a water test. You don’t have to do it, but the water test (that is, cooking three cups of water at high pressure for three minutes) will help you learn the ropes, or at least a few of the buttons. It’ll also help you make sure your Instant Pot is working properly. Water is the essence of pressure cooking, and the Instant Pot depends on steam. If your Instant Pot can’t even heat up water, then something’s not right, and it’s much better to find out you’ve got a dud when you’re experimenting with water.
If you still want practice before you really get cooking, try something simple, yet substantial like Instant Pot Rice (So easy: one part rice, two parts water, press the rice button and go! Disclaimer: I like rice.) or Instant Pot Black Beans. Or, take it up a notch with (still easy!) Instant Pot Lasagna.
Help! I need recipes!
Need a little inspiration? We’ve got an ever-growing selection of Instant Pot recipes and videos.
Where is the Manual button?
Not every Instant Pot has a button that explicitly says “manual,” but they do all have that function. For newer models, just press the “pressure cook” button and manually adjust the time and desired amount of pressure in the center of your pot.
How dangerous is my Instant Pot?
You’ve heard the horror stories: the burned faces, the melted bases. Your Instant Pot gets hot, and most of these injuries are the result of not being cautious. While the handle on the lid may not seem dangerous, the rest of it (the stainless steel part) gets warm, and accidentally touching it hurts. That’s what oven mitts are for. Would you hover over a boiling pot of water? No, so that means you shouldn’t get near the steam after releasing the pressure. Just keep the entire thing away from your face, and maybe don’t let kids get close. It’s also good practice to keep your Instant Pot away from your stove—you could accidentally turn one of the knobs and melt the pot base, for example, or even start a fire.
How do I convert a recipe to the Instant Pot?
So many beloved recipes have already been converted to Instant Pot cooking, so first, let a search engine do the work for you. Look up your favorite recipe and type in “instant pot” and your prayers should be answered. If there’s not an Instant Pot-friendly version of your favorite recipe, check out Pressure Cooking Today’s guide.
Why does cooking take longer than the recipe says?
The Instant Pot may speed up cook time, but like any cooking appliance, it still needs time to get ready. In fact, a big part of the time involved in many Instant Pot recipes is letting the pot build up and release pressure. You wouldn’t just put something in the oven without preheating it or throw meat on an unlit grill. To save time, plug in and turn on the Instant Pot before you need it.
My food’s done cooking. Can I go ahead and take off the lid?
Remember how I said your Instant Pot needs time to build pressure? It’s the same thing with winding down.When you’re using pressure in the Instant Pot, you have two options: a natural release or a manual release. Natural release is what it sounds like. You just let it come back to equilibrium over time before taking off the lid.
But not everyone has time to wait for that, so you can also do what’s called a manual release. For recipes that require a manual release, put on an oven mitt and slide the pressure release counterclockwise so the steam can escape. There will be hissing. If the amount of steam coming out scares you, release the valve incrementally. But be careful, because hot steam is dangerous and some people have been seriously injured by their pressure cookers. Once the hissing stops, or at least becomes a faint whisper (some pots include pressure gauges that drop when it’s safe to take the lid off), you can remove the lid, and for the love of god, or at least your hands, please wear an oven mitt.
Do I need accessories for my Instant Pot?
You can cook plenty of meals without any accessories, but they can add extra convenience and capabilities. Check out our favorite Instant Pot accessories here.
Can I cook frozen food in my Instant Pot?
Yep! Just remember it’ll take a little longer to cook.
Is Instant Pot yogurt really worth it?
Instant Pot maniacs love making their own yogurt, but does that mean you will too? That depends on how much yogurt you eat. If you don’t consume yogurt often or don’t want to put extra money into it, you’re probably better off buying it. But if yogurt is, say, 20 percent of your diet, and you deeply care about the quality of your yogurt, making your own might be great. Plus, Potheads all over the internet have developed customizations including copycat Yoplait Oui and vegan yogurt.
Why does my Instant Pot say burn?
The “burn” or “ovht” (overheat) warnings are simply telling you that you’ve made a mistake that allowed the food at the bottom of the pot to burn. The culprit is likely not enough moisture, but don’t worry: depending on how soon you catch it, your food can still be saved. First, hit the cancel button and release the pressure valve (Please wear an oven mitt! That pot is gonna be hot!). When the hissing stops, open the lid and take a look inside. If your food’s finished cooking it should be fine to eat, even if the bottom’s burned—you just eat around the affected area. If your food isn’t finished cooking (and you can’t transfer it to, say, an oven), you’re going to need to remove the burned food—otherwise, the Instant Pot won’t be able to create steam and do its job. Scrape the burned area out and add some thin liquid, like broth, so the food won’t burn again, and resume whatever setting was on before. Then, plug in however much time left your dish needs.
What’s the big deal with boiling eggs in the Instant Pot?
Boiling eggs is pretty easy, but peeling them is another story. Boiling them in the Instant Pot can fix that, though, and make peeling eggs a cinch. For some people, it doesn’t work, but others swear by it.
How do I clean my Instant Pot?
Cleaning an Instant Pot is just about as easy as using one. The stainless steel and ceramic (if you have one) inner pots are both dishwasher safe, along with the steam rack, lid, and silicone sealing ring. The cooker base, of course, should not get wet—use a damp cloth or cleaning wipe. For marks on the inner pot, base, or lid, use stainless steel cleaner or white vinegar. Don’t forget to clean out the condensation collector every so often so it doesn’t become infested with larvae. The silicone ring is the biggest challenge since it retains odors, especially potent spices like curry mixtures. Pull it out of the lid before placing it in the dishwasher, and for stronger smells, wash it in a mix of soapy water and vinegar. If that doesn’t work, consider replacing the ring or even buying a few to designate to different flavors.
I lost my condensation collector cup. Do I need it?
Nope! Just make sure to wipe down the surrounding area since all of that steam is hitting your counter now.
12 of 18
How to Care for Your Hardworking Instant Pot
If you spent any time looking at food on the internet in 2017, you’re familiar with the Instant Pot. Now that we’re well into 2018, you probably sucked it up and bought one of the pots. You love looking at the machine, shiny and full of possibilities, but you haven’t yet actually used it, because you have no idea how to clean your Instant Pot. Well, roll up your sleeves, because that changes now.
According to the Instant Pot website, the stainless steel inner cooking pot, the sealing ring, the lid, and the steam rack are all dishwasher safe, so if you have a dishwasher, you just saved yourself a whole bunch of time. If you don’t have a dishwasher, these elements can all be hand washed with hot water, dish soap, and a sponge. Replace the sealing ring from time to time for safety's sake, and also to prevent your yogurt from smelling like that chili you made last month.
To most thoroughly clean the lid, first remove the sealing ring and the anti-block shield (these two elements should be hand washed in warm, soapy water). Place the lid in the dishwasher or hand wash it; when the elements are completely dry you can put them back together.
Because Instant Pots are made of stainless steel, a blue- or rainbow-tinted discoloration could form on the surface of the cooking pot, even when it’s completely clean. While these stains are harmless, if they annoy you, get rid of them by filling the pot with ¼ inch of white vinegar and letting it sit for 5-10 minutes. Use a sponge to wipe the pot, then dump out the vinegar and rinse the pot.
The condensation collector doesn’t need to be cleaned every time you use your Instant Pot, but like the water tank of a Keurig or pod-based espresso machine, it should be cleaned every now and then. (If you read this cautionary tale about maggot growth, you may wish to up the frequency.) If you use your Instant Pot several times a week, try to hand wash the condensation collector once a month. Don’t forget to dry it completely before putting it back in its place.
Finally, know that the base of the Instant Pot (which contains the heating element) is NOT dishwasher safe, nor should it be covered in water via hand washing. If you get the base dirty while cooking, let it cool completely, then wipe it with a barely damp dishtowel. Let the base dry completely before turning it on again.
Now, do yourself a favor and go make Instant Pot breakfast ratatouille.
13 of 18
How to Deal With Your Smelly Instant Pot Sealing Ring
The Instant Pot is a real MVP when it comes to shaving time off of prepping your favorite hearty and flavorful dishes. However, after a few uses, the lid and silicone sealing ring tend to harbor odors from dinners past that dishwashing liquid just can’t cut. Gross, right? Even if it seems like you’ve washed these parts within an inch of their lives, don’t lose hope just yet. You can combat the off-putting smells with a few simple maintenance tricks.
First, let’s address the lid...
The Instant Pot’s lid is dishwasher safe, and it’s key that you place it on the top rack, removing the silicone sealing ring and the anti-block shield, in order to give it the optimal washing. It’s also important to double check the steam valve to ensure that there is no food stuck in any small crevices. After washing, make sure the lid is completely dry before you place it back on the pot for storage. That said, if placing your lid in the dishwasher makes you nervous, you can wash it by hand with soapy water and a soft dish cloth.
WATCH: How to Make Instant Pot Beef Stew
Now, about that ring.
Being that the sealing ring is made with (food-grade) silicone, it is highly prone to picking up odors from the foods you cook in your Instant Pot. The ring is a crucial piece of the Instant Pot because it ensures optimal pressure cooking. If the ring becomes damaged or is not inserted in the lid correctly, it can prevent your pot from operating properly—so be sure to pay attention when you remove the ring for the first couple of times so that you know how to properly replace it. This ring should be removed from the lid and washed separately after every use.
A mix of soapy water and vinegar should help remove lingering smells. However, over time, the smells may become more difficult to remove. The Instant Pot care and cleaning guide recommends that if you cook both savory and sweet dishes in your pot, it would be best to have separate rings for each style of cooking. One easy solution is to simply purchase a few replacement silicone sealing rings and swap them out on a regular basis. You can order a package of two on Amazon for about $12, so you may want to go ahead and stock up on enough to allow for tossing your old ring every couple of months or so.
The care guide also recommends that you wash the ring in the dishwasher on a high temperature with an extra-strength detergent. It also claims that you can soak your ring in tomato juice (an acidic liquid) overnight night and then place it the dishwasher for further cleaning. This method also works with a water-based solution of vinegar or lemon juice.
Still stinky? Here’s another trick you may want to try: Store your sealing ring in a plastic bag filled with baking soda or ground coffee. Both baking soda and coffee have the ability to neutralize strong odors. That said, if you go the coffee route, your ring may also pick up the odor of coffee; therefore, you should run it through the dishwasher after it’s stored in the bag for a few days.
Of course, if you don’t fancy yourself a DIY-type of person and all of these cleaning “hacks” immediately register as a real pain, I’d suggest purchasing a set or two of the replacement rings and calling it a day.
14 of 18
Why I Love Making Yogurt in My Instant Pot

If there’s anything you need to know about me, it’s this: I like yogurt. Partially in thanks to my Persian heritage, I’ve eaten it as long as I can remember, whether it was a snack, a side, a breakfast, a dessert, or dip. I’ll easily eat half a gallon of yogurt a week; my fridge will always house some form of plain, whole-milk yogurt, because that’s how I prefer to start my mornings. For other meals, I’ll slap it atop shredded chicken and beans, substitute it anywhere I need sour cream, or dollop some over anything that needs a little tang, including my dog’s meals. (What can I say? He likes it too.)
So yes, while I do use my Instant Pot to cook all kinds of things, I bought it with the intention of making my own yogurt. It was a dream of mine for years, and attaining it was much easier than I suspected. You may not eat a lot of yogurt, and if so, then I’ll admit making your own wouldn’t be very practical. But for me, it’s a way of life.
Watch: How to Make Instant Pot Mac and Cheese with Bacon
To make yogurt in your Instant Pot, you only need a few things: milk, a yogurt starter (a.k.a. already-made yogurt), a meat thermometer, oven mitts, and patience. The Instant Pot may speed it up a little, but yogurt making is still a time-intensive process. You don’t have to set aside an entire day for it, but do make sure you’re around for key steps. It’s best to play it safe and ensure you don’t accidentally leave the milk out too long in case it spoils.
It may sound counterintuitive that you need yogurt to make yogurt, but you’ve gotta have that culture. Don’t use more than three tablespoons of starter per half gallon of milk: the bacteria will crowd up the milk and make the yogurt thinner. You’ll want to use whole milk. Anything else will yield a soupy texture. The Instant Pot cult swears by Fairlife, but you can use whatever brand of milk you trust. I use Horizon. Additionally, take your Instant Pot’s size into account: a 3-quart Duo Mini works best with a half gallon of milk, but the big boys can take more.
First, pour half a gallon of milk into your Instant Pot, seal it, and press the “Yogurt” setting until you get “Boil.” Once the boiling’s done, let the steam release, turn the Instant Pot off, and remove the lid. Wearing oven mitts, remove the inner bowl and set it somewhere the milk can cool down, like a wire rack or in the fridge. Stir the milk occasionally, and let it hit 115 degrees Fahrenheit.
Next, put your three tablespoons of starter yogurt in a medium-sized bowl, and add ⅔ cup of the milk. Stir the mixture with a whisk until it’s uniform and transfer it back to the Instant Pot’s inner bowl. Replace the bowl, close and seal the Instant Pot, and press “Yogurt.” It’ll need to cook for eight hours, and if you like, you can cook it a little longer to make it thicker. Remember, it’s yours.
Before your yogurt’s complete, make sure you have a way to store it, whether it’s recycled Yoplait Oui containers or a large Pyrex dish. After it’s done cooking, transfer the yogurt to your container(s) of choice. To thicken the yogurt further (think Greek yogurt consistency), strain it with some cheesecloth first. Then, let it sit in the fridge for at least six hours—if it’s late, let it sit overnight, and enjoy your yogurt with some fruit and granola for breakfast the next morning.
Note: if you’re too lazy to strain your yogurt (as I was), your first batch will be thin. Maintaining the culture—that is, using spoonfuls of your own yogurt as the starter in subsequent batches— will result in thicker, creamier yogurt. It simply takes time and dedication.
15 of 18
5 Clever Hacks for Your Instant Pot That You Haven't Tried Yet

If you have an Instant Pot ($60 for a 3-quart; amazon.com), no doubt you’re already slow- and pressure-cooking your way to healthy meals like a boss. But there are a few clever hacks for the buzzy appliance that can really up your game. Read on for five ways to make your Instapot even more essential.
Cook easy-to-peel hard-boiled eggs
Don’t you just hate making perfect hard-boiled eggs, only to struggle to peel them (and end up with mangled eggs)? Us too. This is an effortless fix: According to Nom Nom Paleo blogger Michelle Tam, cooking eggs in your Instant Pot makes peeling them a cinch.
Melt cheese for fondue
Fondue is one of those classic retro comfort-food dishes we love to indulge in from time to time—but not often enough to keep a fondue pot on hand. And while making fondue in a regular pot is possible, it can be tough to maintain the temperature you need. Instant Pot to the rescue. Get those apple slices ready for some perfectly warm, melty cheese.
Watch: How to Make Instant Pot Asian Chicken Thighs
[tiVideo is_video="1" video_id="454929"]
Proof your dough
Yep, you can even use your Instapot when you're baking bread from scratch, says Daniel Shumski, author of the cookbook How to Instant Pot ($16, amazon): “When you make bread dough and you want it to rise in a warm area, use the lowest setting for yogurt making."
DIY ricotta
Here's another hack for the Instant Pot's "Yogurt" setting: It makes it easier to get the right temperature range to make homemade ricotta. (As Shumski points out, “[c]alling it the ‘yogurt making’ setting kind of sells it short.”) Making ricotta yourself gives you a much better-tasting cheese without the gums and other stabilizers often added to packaged varieties. Check out the video tutorial below from Real Food Real Deals blogger Annemarie Rossie.
Make Jam
No pectin? No problem. Wardee Harmon, author of The Complete Idiot’s Guide to Fermenting Foods ($20, amazon.com), has a quick, easy recipe for Instant Pot blueberry jam on the Traditional Cooking School blog. The best part: It only calls for two ingredients—fruit and honey—so you don't need pectin and cups of white sugar to get gelled jam. Pass the toast.
This article originally appeared on Health.com.
16 of 18
How to Make Your Thanksgiving in the Instant Pot

If you’ve still yet to hop aboard the Instant Pot train, there’s no time quite like Thanksgiving to understand why there is such a strong following behind this appliance. Whether you’re hosting this year’s festivities and feeling a little overwhelmed by all the dishes you’re trying to get on the table, or you’re attending and not quite sure how you want to shake things up this year, there’s certainly a time and a place for your Instant Pot to come in clutch and make this Thanksgiving the best one yet (or at least the best tasting).
Breakfast
[tiImage is_image="1" image_id="447063" image_style="1200x900" align="center"]
Arguably one of the most overlooked parts of the Thanksgiving experience, let's not forget that you actually need to eat breakfast that morning. You'll still have space for dinner, trust me. That said, a hearty bowl of steel cut oats or french toast casserole are both very legitimate ways to fuel yourself, and your crew, for a long day of cooking (...and eating).
Mashed Potatoes
For the creamiest, most decadent bowl of mashed potatoes you’ve ever laid on your holiday table, you better believe that you should let your Instant Pot do the work for you. Serve them as is, or dress them up a bit more with fresh herbs, sour cream, and of course, plenty of butter.
Watch Now: How to Make Instant Pot Mashed Potatoes
[tiVideo is_video="1" video_id="460998"]
Gravy
Treat your Instant Pot like a saucepan on the stovetop and make your favorite Thanksgiving gravy there. Whether you go vegetarian or make a gravy with turkey drippings, your cozy Instant Pot is just the appliance to create such a crucial condiment for your Thanksgiving spread and keep it warm until dinnertime. That's just one more burner on the stove, open for use.
Cranberry Sauce
If the canned stuff just doesn’t float your boat, you can start from scratch on some raw cranberries and build a flavorful, sweet sauce all in your Instant Pot. This favorite recipe, featuring fresh ginger and orange, is easily made using the slow cooker settings on your Instant Pot. Beware, once your family gets a spoonful of this vibrant version, they’re never going to want to see that cylindrical mass of canned cranberry gel on the table again.
Stuffings and Breads
You can either take your favorite stovetop stuffing recipe and convert it to an Instant Pot classic You’ll have to toast your bread cubes in the oven, but from there, you can do the rest in your favorite appliance. Alternatively, you can give this elegant Wild Rice and Mushroom Stuffing a try by, again, using your Instant Pot's slow cooker function. Of course, if you're wanting to get your carb on with a homemade loaf, look no further than this easy Instant Pot beer loaf to get things going.
Veggie Sides
[tiImage is_image="1" image_id="446955" image_style="1200x900" align="center"]
Don't worry guys, we didn't forget about vegetables. From a cozy butternut squash soup, to grain and chickpea salads, to pressure cooked beets (perfect for tossing into a lovely beet salad), your Instant Pot has got you covered. Additionally, you can use your appliance to speedily cook through squashes, gourds, potatoes, and other root vegetables, which you can then use in other dishes. BOOM is right!
Macaroni and Cheese
If you’re going for a casserole-esque mac and cheese, then you’re probably better of sticking to a casserole dish and your oven in order to achieve that crunchy, crackly top. However, for a creamy pasta dish that’s ready in a heartbeat, go ahead and cook your noodles, followed by your cheese sauce in the Instant Pot and be done with it!
Turkey...Breast
Okay, so I’m not going to outwardly lie to your face and encourage you to cook a turkey in the Instant Pot, because...no. However, if your Thanksgiving crowd is a small one this year (how pleasant and intimate), you can definitely get away with cooking a turkey breast in the Instant Pot. Or if you're open to going with a different bird, you can cook a whole chicken in your Instant Pot.
Dessert
[tiImage is_image="1" image_id="446853" image_style="1200x900" align="center"]
Yes, you can and you should fall back on this trusted appliance to help you round out dessert. It might not be able to churn out an apple or a pecan pie, but it sure as heck can go to town on a cheesecake. Go rich and chocolatey with this Instant Pot cheesecake masterpiece or go for these individual cheesecakes (scaling the recipe up if you need) if you have a small group. Spice your cheesecake filling to be pumpkin spice, cinnamon, or your favorite seasonal flavor. If you're looking to take the warm and gooey route, go ahead and fix this Chocolate Espresso Pudding Cake, and call it a day because you just rocked out an entire holiday in the same dang appliance. The Instant Pot gods would be proud.
17 of 18
11 Things You Didn’t Know Your Instant Pot Could Do
If you believe the hype of Instant Pot owners—and we do—you’d know how magical these multi-purpose countertop cooking appliances can be. Sure, they make quick work of tenderizing a dense pork shoulder. They can have beef chunks, carrots, and potatoes soft and simmering in a delicious sauce in a matter of minutes. Instant Pots can even turn hearty whole grains that typically need more than 30 minutes of simmering into fluffy pieces in less time than it takes to boil instant rice.
However, as curious home cooks experiment with their Instant Pots, the Internet’s collection of unusual but totally legit ways to use the pressure-cooking device continues to grow. Some are a little out there—cough syrup, for example. Some are downright genius—keep reading. But all are a sign that you don’t have to think of your Instant Pot as just a glorified slow cooker anymore.
#1 You can reheat leftovers.
People living without a microwave have likely created a series of genius alternatives to nuking their day-old ziti, from baking in the oven to simmering in a saucepan or skillet. Using an Instant Pot to heat up those leftovers might be the most efficient way you can warm them, however.
How to do it: Pour one cup of water in the Instant Pot insert. Place the metal rack in the insert. If the leftovers are not in heat-proof containers (like Pyrex bowls or mason jars), you need to transfer the food to those safer containers. If the food is likely to dry out in reheating (rice or pasta, for example), consider adding stock, water, or another liquid.
When the food is ready to be heated, cover the container with foil, and place it in the Instant Pot. Turn the pressure cooker to Steam, and set a five-minute timer. That’s typically enough time to get pasta, lasagnas, soups, or stews warm.
When the time is up, let the machine release the pressure naturally. Then open the vent and lid, and use pot holders to lift the container out of the Instant Pot. If you need more time, repeat the steps, but decrease the amount of time you steam the food.
#2 You can make applesauce.
Before you dismiss this idea for the cloyingly sweet muck that is passed off as applesauce in many grocery stores these days, know the beauty of making your own applesauce in an Instant Pot is that you get to control the sweetness. Indeed, you also get to control the spices and the texture. Basically, you can make applesauce just how you like it, as thin or as lumpy as you like with as much or as little cinnamon as you can stand.
How to do it: When picking out apples for sauce, select the ones you’d normally avoid for apple pie because of their tendency to fall apart under heat and pressure. Those are precisely the apples you want for this recipe. Fuji and Golden Delicious come to mind.
Then, core the apples and slice them in two-inch wedges. You can remove the peel before you slice the apple if you want, but the skin is a great source of nutrients and fiber. Plus, you can pulverize it with a blender later.
Add the apples, one cup of water, and your spices of choice (cardamom, vanilla extract, and cinnamon are common). Don’t forget a sprinkle of salt. Stir to coat the apples, then put the lid on the Instant Pot and set to seal.
Next, set the pressure cooker to cook on High with a timer of five to seven minutes. After the timer goes off, let the pressure release naturally. Remove the lid, and then use an immersion blender to turn the lumpy apple mixture into silky, delicious apple sauce. Store the apple sauce in mason jars for up to 10 days in your fridge.
#3 Hard boil eggs for the week.
If you’re a big fan of hard-boiled eggs for breakfasts or snacks, you may have mastered the art of cooking eggs on the stovetop, but if you need to make more (several dozen, perhaps), you can use your Instant Pot to cook them more efficiently.
How to do it: Place a basket or wire trivet in the bottom of the Instant Pot. Add one cup of water. Place as many or as few eggs as you want to cook in the Instant Pot, and put the lid on the cooker. For a soft-boiled egg, cook on high for four minutes. For a more hard-boiled egg, cook on high for five minutes. Let the steam release naturally, then move the eggs into ice-cold water.
The total time comes out to about 15 minutes (five minutes to pressurize, five minutes to cook, and five minutes to release the pressure), but that’s still faster than stovetop boiling, and you’ll get a lot more eggs cooked at once.
#4 Make homemade bread.
You will still cook your no-knead bread in your cast-iron pan, but the Instant Pot can shave off hours of rising, punching, and waiting. For people who love homemade bread (and who doesn’t?), the Instant Pot is perhaps the best method to get the dough to rise quickly without stressing the yeast and proteins.
How to do it: Turn to your Instant Pot’s handy-dandy Yogurt setting for this trick. This setting provides a constant source of low heat, which is just enough to make a bread dough rise faster. Make your dough with any no-knead recipe of your choice. When the dough is sticky, move it to a piece of parchment paper, and lower that parchment paper into an Instant Pot. Set the timer on your pressure cooker for Yogurt and four hours and 30 minutes. (Typically, the bread dough would need 24 hours to rise.)
When the time is up, use the parchment paper to life the inflated dough out of the Instant Pot. Reshape it into a ball, punching down to remove some air. Then put the dough once more into the pressure cooker on the Yogurt setting. This time, you’ll only need 30 minutes.
While the dough rises one last time, preheat your cast-iron pan and oven to 450°F. When the 30 minutes has elapsed, slip the dough into your hot skillet, place the lid on it, and slide the pan into your oven. Bake for 30 minutes, then remove the lid. Continue baking for 10 to 15 minutes or until a golden crust forms.
#5 Pop plenty of popcorn.
If you don’t have a large saucepan or tall pot, you can use your Instant Pot as your go-to popcorn popper. It’s actually so simple you may soon bid farewell to anything that comes in a microwavable bag.
How to do it: Turn your Instant Pot to the Saute feature, selecting “More” to get the pan a bit hotter. When the surface of the pot is hot, add an oil of your choice (canola oil is good, as is coconut oil). When it begins to sizzle, pour in popcorn kernels. Cover with a lid. Listen for the popcorn to pop, and turn off when about two-thirds of the kernels are popped so you can prevent scorched kernels. Before serving, sprinkle with your preferred seasoning, and gently toss.
#6 Make homemade vanilla extract.
You can DIY this baking necessity if you have time and patience to wait. (The process typically takes several weeks) But you can also speed it up with your Instant Pot. This particularly comes in handy if you forget to make favors for your bridal shower or a thank-you gift for your neighbors and need something pronto.
How to do it: Using the pot-in-pot method, pour one cup of water in the Instant Pot, and place the metal trivet in the bottom of the pot. In pint-sized mason jars, combine two cups of high-quality vodka and vanilla beans that have been split with a knife. (One bean per jar is fine.) Leave at least one inch of space between the vodka and the jar lid. Seal with jar tightly, but not firmly, and place each jar in the Instant Pot. Close the Instant Pot, and cook on high for 30 minutes to one hour. After the end of a natural release, remove the jars from the Instant Pot, and let them cool naturally. Swirl each jar a few times while they’re cooling.
The extract is likely ready to use right now. However, before you do, smell the extract. If it is still predominantly vodka, let the jars sit for a few more days with the vanilla beans in the liquor, swirling daily. You can remove the vanilla beans from the extract if you wish, but they’re OK to leave, too. However, they will begin to disintegrate and may leave particles behind in your extract.
#7 Share some bottles of homemade Limoncello.
In theory, you could drink the vanilla extract, but it wouldn’t be nearly as delicious as you might imagine. What is seriously good for sipping, however, is limoncello, a sugary lemon liqueur that’s great as an aperitif or after-dinner dessert beverage.
How to do it: You’ll need the same equipment for limoncello as you did for vanilla extract: your Instant Pot, trivet, and mason jars. For ingredients, you’ll need lemon peels, vodka, water, and sugar.
For the first step of this process, you need to infuse the vodka with lemon. Pour one cup of water in the Instant Pot, and place the metal trivet in the bottom. In each pint-sized mason jar, add vodka and lemon peels, leaving about an inch between the top of the liquid and the jar lid. Place two big strips of lemon peel in each jar, and seal the lid tightly but not firmly. Use the Instant Pot’s manual function to cook on high 30 minutes. Then let the machine release the pressure naturally. Remove the jars, and set them aside to cool overnight.
The next day, strain the lemon peel out of the vodka, and combine the lemon-infused liquor in a larger jar. Add simple syrup to the vodka mix to taste. Cool, then pour into bottles, and enjoy.
#8 Turn a fruit bounty into quick preserves.
If your strawberry patch was more generous than you had expected, you can use your Instant Pot to make quick jam or preserves. This procedure doesn’t sterilize the fruit spread for long-term use, but you can store the preserves in jars and use up to a week later. (Or share with your friends and neighbors, with the caveat that they too need to use them quickly.)
How to do it: Wash, clean, and slice three to four pounds of strawberries. Add the juice of one orange, and a few tablespoons of sugar. Set the Instant Pot to Manual mode, and cook four to five minutes. Let the pressure release naturally. If the fruit isn’t falling apart when it’s stirred, you may need a minute or two more.
When you like the texture, remove the strawberry mix to a blender or food processor, and gently combine to make more smooth. Pour into prepared jam jars, and enjoy using on everything from biscuits and toast to ice cream and oatmeal.
#9 Melt chocolate with ease.
You’ve never seen the point in investing in a double boiler for the one or two times a year you really need to dip a lot of fruit in chocolate. However, now that you have an Instant Pot, you’ve basically got everything you need to engineer your own fancy double boiler at home.
How to do it: Fill your Instant Pot with water, almost to the top. Turn on the machine’s Sauté function, and heat to Normal. Place a glass bowl that is slightly larger than the opening of the Instant Pot into the appliance, being sure to not overflow the water. Pour chocolate chips or chopped melting chocolate into the bowl. Wait five to 10 minutes for the water to heat through and begin to melt the chocolate. When the chocolate begins to melt, stir occasionally until smooth and uniform. Turn off the Instant Pot. Then turn it back on to Keep Warm. This will keep the water from cooling quickly, so you have smoother chocolate longer for lots of dipping.
#10 Bake a whole cheesecake.
You didn’t know you wanted to make a cheesecake in your Instant Pot, but I bet as soon as you see how easy it is, you’ll be finding many reasons to make this creamy dessert.
How to do it: Pour one cup of water in the bottom of an Instant Pot. Place the wire trivet in the pot. Next, fill the bottom and sides of a six-inch springform pan with a graham cracker crust, and pour in your preferred cheesecake mixture. (You’ll need to look for a recipe that makes a smaller cheesecake, as most are written for nine-inch pans.) Cover the cheesecake with foil.
Transfer the springform pan with unbaked cheesecake to the Instant Pot, and seal the pressure cooker. Cook on Manual Low for one hour, or until the cheesecake’s center jiggles but isn’t still liquid. Cool the cheesecake on a wire rack, and then refrigerate overnight. (Those quick strawberry preserves would be a great topper—hint, hint.)
#11 Roast a whole chicken.
You already knew you could cook big cuts of meat like pork shoulder and beef roast in a fraction of the time you’d need in a slow cooker or oven braiser. But the same magic that helps break down those dense proteins can cook whole chickens perfectly while still keeping them juicy.
How to do it: Sprinkle a fresh or thawed whole chicken with salt and pepper. Set the Instant Pot to Sauté, and brown the chicken breasts and sides in the Instant Pot for three to four minutes on each point. Remove the chicken from the Instant Pot, and deglaze the pan with stock or broth. Place the metal trivet in the Instant Pot. Before returning the whole chicken to the pressure cooker, add any seasonings to the skin or cavity, then put the chicken in the Instant Pot. Seal the cooker, and cook on high. The time depends on the size of the chicken. Plan for six minutes per pound of chicken, plus three additional minutes. For example, a four-pound chicken would need 27 minutes.
When the time is up, let the pressure release naturally. Check the internal temperature of the chicken, and cook for several more minutes if it’s not done at the centermost point.